
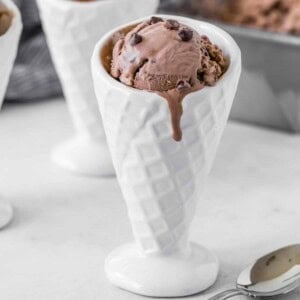
This smooth and creamy no-churn chocolate ice cream recipe is full of fudgy flavor and easy to make without an ice cream maker. Add chocolate chips for double the chocolate!
Recipe Overview
Why you’ll love it: This homemade chocolate ice cream is ultra creamy and tastes like gourmet ice cream. No ice cream maker needed!
How long it takes: 15 minutes to prep, 6 hours to freeze
Equipment you’ll need: electric mixer, large mixing bowl, loaf tin
Servings: 10

Easy Homemade Chocolate Ice Cream Recipe
As many of you know, my kids both have severe food allergies. Finding ice cream that’s safe for them to eat is a challenge, but we make the best of it. Case in point: homemade chocolate ice cream! This no-churn ice cream recipe is an easy frozen dessert.
There is no missing out on anything with this rich creamy homemade ice cream. My kids are obsessed with the chocolate flavor. It’s the best taste of summer I can give them! The best part? I don’t have to haul out my ice cream maker. Since I’m slightly lazy in the heat these days, that’s a win-win. I hope you guys try it and love it!
If you like the idea of making your own frozen treats, be sure to check out my list of 14 delicious frozen desserts.
Why This Ice Cream Recipe Works
I make this no-churn chocolate ice cream without the ice cream maker! Here’s why this no-churn recipe works:
- Only 4 ingredients. You need only 4 ingredients to make this ultra-rich and creamy homemade chocolate ice cream. Heavy whipping cream and sweetened condensed milk form a base that’s ultra-rich and creamy.
- No ice cream maker. You don’t need any special equipment apart from an electric mixer. All it takes is 15 minutes to whip up the chocolate ice cream, then a few hours in the freezer to set.
- Extra chocolatey. This is the ultimate recipe for chocolate ice cream lovers. It’s full of rich, cocoa flavor. I also throw in chocolate chips (because, why not?), but that’s totally up to you.

What You’ll Need
Below, we’ll go over the easy ingredients you’ll need to make this homemade chocolate ice cream. Refer to the printable recipe card below the post for complete instructions and recipe measurements.
- Sweetened Condensed Milk: You’ll find cans of sweetened condensed milk near the baking supplies. Don’t confuse it with evaporated milk, another canned milk product. They are very different and can’t be substituted for each other.
- Heavy Cream: Look for heavy cream with at least 36% milk fat. This is important. Half & half or light whipping cream won’t work as well. Make sure the cream is well chilled, as cold cream whips up more easily.
- Unsweetened Cocoa Powder: Often used in baking, cocoa powder is made from crushed cocoa beans that are processed to remove the cocoa butter. It is high in antioxidants and is actually quite good for you. If your cocoa powder has hard lumps in it, sift before using it.
- Pure Vanilla Extract: This extract adds sweet vanilla flavor to the ice cream.
- Mini Chocolate Chips: For double chocolate ice cream, mini chocolate chips are stirred in. Save some and use the extra for topping the ice cream. You can choose to skip the chocolate chips if you like.
How To Make Chocolate Ice Cream
This fudgy, creamy no-churn chocolate ice cream couldn’t be easier to make. Let’s get started:
- Mix the ingredients. Let’s get started! In a small bowl, stir together the sweetened condensed milk, cocoa powder, and vanilla. You’ll find that the milk is very thick so it’s fairly easy to blend in the cocoa.
- Whip the cream. Next, in a large bowl, whip the chilled heavy cream with an electric mixer or stand mixer. Beat the cream until it will stand up in stiff peaks. That means they don’t droop over when you lift out the beaters. It will take about three minutes.
- Combine. After, carefully fold in the milk mixture. Use a very light touch; you don’t want your whipped cream to deflate. Mix it in just until combined.
- Fold in the chocolate chips. The whipped cream mixture should be pretty thick so you can safely add all those chocolate chips without worrying about them sinking straight to the bottom of your container.
- Freeze. Lastly, transfer the mixture to the loaf pan and smooth the top. Sprinkle with additional chocolate chips, if desired. Cover the pan with aluminum foil and freeze your ice cream for 6 hours or overnight.

Tips for the best no-churn ice cream
Keep these tips in mind when making chocolate ice cream from scratch:
- Before whipping the cream, chill the bowl and beaters for fifteen minutes or so ahead of time. To colder the tools, the better the cream will whip.
- Stir in the chocolate chips gently. You don’t want to overmix the ice cream base, as this can deflate the air pockets needed for light, creamy ice cream.
- Use the right-sized pan. A loaf tin works well because it’s compact and easy to fit in your freezer, much like a carton of ice cream.
Traditional ice cream is “churned” in an ice cream maker, making it super soft, creamy, and smooth. No churn ice cream skips the churning process. All you need is a stand mixer or hand mixer to whip the cream.
Make sure to use full-fat condensed milk and heavy whipping cream when making homemade ice cream. The high-fat content is important to yield ice cream that’s creamy and light, not hard and dense.

Make This Recipe Your Own
This creamy, rich, and decadent chocolate ice cream is easy to customize. The world is your oyster! What would you put in this ice cream? Try these fun add-ins and variation ideas:
- Rocky Road: If you aren’t a nut-allergy fam, try adding mini marshmallows and chopped nuts, like almonds or peanuts. Fold them in with the chocolate chips.
- Fudge Swirl: Want triple chocolate? I’m with you! After pouring the ice cream into your loaf pan, drizzle the top with a half cup of fudge sauce and swirl it in for big, beautiful ribbons of hot fudge. You could do the same with caramel sauce. Just make sure the sauce is at room temperature, not hot.
- Mocha ice cream: Add 1 tablespoon of espresso powder when you add the cocoa powder. Yum!
- Mexican hot chocolate: Such a good combo! Add a teaspoon of ground cinnamon and a little pinch of cayenne when you add the cocoa powder to the recipe.
Store your ice cream airtight in the freezer for up to two months. For best results, line the loaf pan with parchment paper before freezing the ice cream. Once frozen solid, lift the ice cream out of the pan with the parchment paper and transfer it to a resealable container. It helps to place a layer of plastic wrap or parchment paper directly on top of the ice cream so that it stays fresh and free from freezer burn.
More Frozen Treats to Try

Homemade Chocolate Ice Cream (No Churn)
Ingredients
- 1 can (14 oz.) sweetened condensed milk
- ¼ cup unsweetened cocoa powder
- 1 teaspoon pure vanilla extract
- 2 cups heavy cream, well-chilled (36% milk fat)
- ½ cup mini chocolate chips (extra for topping if desired)
Instructions
- Pour sweetened condensed milk into a small bowl. Mix cocoa powder and vanilla extract into sweetened condensed milk until combined. Set aside.
- Pour heavy cream into a large mixing bowl or the bowl of a stand mixer. Use a hand mixer or stand mixer on medium-high speed to whip the cream until it holds stiff peaks, about 3 minutes (less if you’re using a stand mixer).
- Add sweetened condensed milk mixture and chocolate chips to whipped cream. Fold together until just combined and silky and smooth. A few small lumps may remain, it’s important not to over mix as that will deflate the mixture.
- Spread into a 9-inch loaf pan. Cover with foil and freeze for at least 6 hours or until firm.
Notes
- For longer storage: Line the loaf pan with parchment paper before freezing the ice cream. When it’s frozen, lift the ice cream out of the pan with the parchment paper and transfer it to a resealable container. It helps to put a layer of plastic wrap or parchment directly on top of the ice cream so it stays fresh.
- Once this is in the freezer for awhile, it can get quite hard. I recommend taking it out of the freezer 10 minutes prior to serving.
Nutrition
Nutrition information is automatically calculated, so should only be used as an approximation.


This is luscious! It will be on repeat for along time.
So glad you liked it! Thank you for leaving a review!
Can I use popsicle molds?
I’m not sure it would freeze hard enough to work in a popsicle mold, but let me know if you give it a try!
Creamy and easy Could add nuts too.
Definitely! Any number of add-ins would be delicious!
BEST ICE CREAM EVER!!!!
I have made this for my family numerous times and we all absolutely LOVE LOVE LOVE it!!
It’s so easy and turns out yummy every time. Thank you for sharing this delicious recipe.
So glad you enjoy it! Thanks for taking the time to leave a review!
I love this recipe, its so smooth and has great flavor!
So glad to hear you like it! Thanks for taking the time to leave a comment!
I’m going to use this as the ice cream base for vienetta. Going to pipe it into a loaf pan, layered with thin almond bark chocolate.
Oh yum! I bet that was amazing!
This icecream is so easy and so tasty! The texture is more like gelato! Amazing!
Thank you for sharing it!
So glad you liked it! Thanks for taking the time to leave a comment!
Can I use vanilla Essence for this ice cream don’t have vanilla extract.
I haven’t ever worked with vanilla essence, but I bet it would work!